Hey everyone, today I want to share my little DIY project – making a constellation booklet. It was such a fun and engaging experience, and I think you guys might enjoy it too!
So, I started by gathering all the materials. I grabbed some dark blue cardstock for the pages, white and silver gel pens for drawing the constellations, a ruler, scissors, and a hole punch. Oh, and I also printed out some constellation charts from the internet for reference. Nothing fancy, just the basic stuff you can find online.
First, I cut the cardstock into smaller rectangles, about the size of a postcard. You can make it any size you want, but I found this size worked best for me. It was small enough to be cute and handy but large enough to fit a decent-sized constellation drawing.
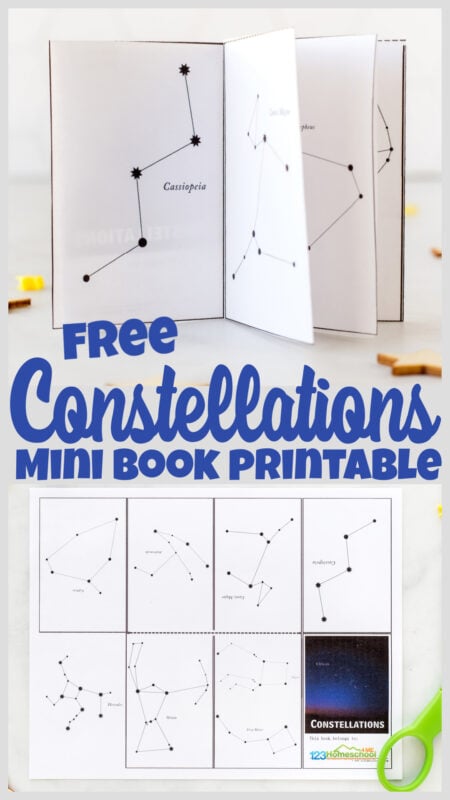
Next, I started sketching the constellations on the cardstock. I used the printed charts as a guide and lightly penciled in the basic shapes and star positions. It didn’t have to be perfect, just a rough outline to follow with the gel pens. I decided to start with the more famous ones, like Ursa Major, Orion, and Cassiopeia. Easy ones to warm up.
Once the pencil sketches were done, I went over them with the white and silver gel pens. This was my favorite part! I added little dots for the stars and connected them with lines to form the constellations. I used the silver pen to highlight the brighter stars, making them pop out a bit more. I really took my time with this, making sure each star was distinct. I am not an artist, but they looked pretty decent.
After finishing each constellation, I wrote the name of the constellation at the bottom of the card in a neat, cursive style. Below the name, I also jotted down a few interesting facts or myths about each one. I looked these up online as I went. Did you know Orion was a mighty hunter in Greek mythology? Yeah, these details made the booklet more interesting.

- First, arrange them in an order that makes sense.
- Then, punch holes on one side of each card.
- Finally, tie them together with a ribbon or string.
When all the pages were done, I arranged them in the order I liked. I decided to group them by the seasons they are most visible. Then I punched two holes on the left side of each card and tied them all together with a simple black ribbon. You can use a fancy string or yarn, whatever you have on hand.
Result
And that’s it! The booklet turned out pretty cool. It’s a neat little guide to the constellations, and it’s something I can easily carry around when I go stargazing. Plus, it was super satisfying to make something with my own hands. I ended up making a few extra copies to give to my nieces and nephews. They loved it. It’s always great to share something you’re passionate about, right?
I highly recommend giving this project a try. It’s a great way to learn about the constellations and have some creative fun at the same time. If you do make one, let me know how it goes!


